DaycareAnswers Home
›
Projects for Preschoolers
›
Fathers Day Crafts
Preschool Fathers Day Crafts
|
The Preschool Fathers Day Crafts page is perfect for preschoolers and toddlers. These projects are kid tested and provider and parent approved! They are appropriate for little hands that even the youngest artist can contribute to. |

Preschool Fathers Day Craft:
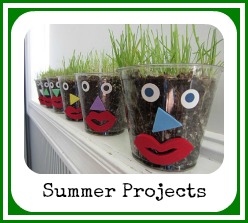
#1 Dad Trophy
The trophy is cute enough to give to Dad, but you can also fill the top of it with peanuts in the shell, small cookies or anything else you can come up with.
|
Supplies Needed:
|

I started this project by letting the kids assist me with taping the two coffee cups together. (Bottom sides meeting in the middle.) I then took a day to spray paint them yellow.
Print the stencil on cardstock paper and let the kids cut out any of the pieces that are within their capability. The "D" shape on the stencil is for the handles. After they are cut from the cardstock, let the kids color them yellow with a marker.
The craft foam pieces are up to you on what you cut out and what you purchase. You'll most likely have to cut out #1 Dad, but you should be able to find foam stars at the craft store if you don't want to cut them all. School age kids should be able to cut stars for their own trophy.
Preschool Fathers Day Crafts:
Duct Tape Picture Frame
What Dad doesn't have a roll of duct tape among his tools? That's what makes this picture frame so appropriate for Fathers Day Projects for Preschoolers.
|
Supplies Needed:
|
Cut strips of duct tape and help the kids wrap them around the cardboard picture frame. Wrap in different directions to change effects.
I went on my computer to print out the words "Dad and Duct Tape Keep Our Family Together" in a font that the kids could color. I wouldn't let the younger kids color it, because they tend to scribble over it until it is illegible.
Use double stick tape to attach the photo of the child. Then tear small strips of duct tape to place at each corner of the photo.
Return to Top of Preschool Fathers Day Crafts
Preschool Fathers Day Crafts:
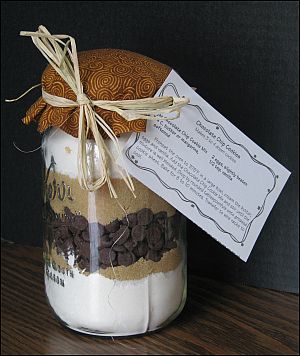
Dad's Cookie Jar
All Dad's like chocolate chip cookies! Have the child make the gift, then encourage Dad to bake the cookies with the child.
|
|
Supplies Needed:
|
- Ingredients for in the jar:
- 1 teaspoon baking powder
- 1 teaspoon baking soda
- 1/2 teaspoon salt
- 3/4 cup all-purpose flour
- 1/4 cup sugar
- 1/4 cup brown sugar
- 1 cup chocolate chips
- 1/2 cup brown sugar
- 1/4 cup sugar
- 1 cup all-purpose flour
Print the "Cookie Recipe" on card stock paper and cut out with edging scissors. Punch a hole in top, left corner.
Fill the jar with recipe ingredients, layering in the order given. Pack each layer before adding the next ingredient.
Place the flat piece of the lid on the jar. Top with a small amount of pillow stuffing, if desired. Next, place on the 9" circle of fabric. Screw the cover down with the second piece of the lid.
String the "Cookie Recipe" card onto your ribbon or raffia and tie onto to the outer ring on the jar.
Return to Top of Preschool Fathers Day Crafts
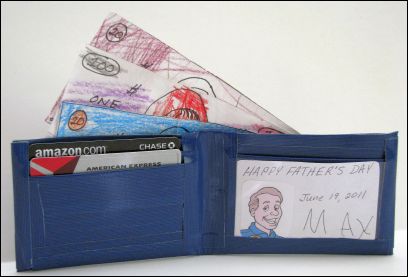
Duct Tape Wallet
I did this project for Father's Day one year. What I found was that this wallet is actually too hard for daycare aged children to make. But I made the wallets and let the kids help in any way they could with the items we placed inside. They had fun helping in this way and then their dads gave them the wallets to play with after Father's Day and they loved them!
|
Supplies Needed:
|
Cut eight 10-inch strips of duct tape. Lay one strip, sticky site up on your work surface. Place a second strip, sticky-side down, halfway down on top of the first strip. Fold down the top of the first strip over the second strip, then turn over the strips.
Place another strip of tape to the second strip, sticky sides together and then flip over the strips again. Continue building this duct tape sheet until it is six inches long, then fold up the bottom edge of the last strip.
Trim the duct tape sheet to measure 9" by 6".
Fold the sheet in half and crease the fold. Use strips of duct tape to bind the sides of the wallet together.
Repeat these steps to create another duct tape sheet. You then need to cut four 4" x 2" rectangles from this sheet, keeping the outer folded edge of your sheet as one side of each rectangle.
Set one rectangle aside. Stack the other three rectangles together, folded edges at the top, placing each one 1/4 inch lower than the one beneath it. Tape these pieces in place on the left half of the wallet, 1/4 inch in from the edge and 1/4 inch from the top of the wallet. Tape the fourth duct tape rectangle to the right half of the wallet, securing the bottom and sides in place accordingly.
To add a photo or ID holder, cut a 4" x 2" rectangle from a clear plastic report cover. Place the plastic rectangle over the duct tape rectangle on the right side and tape it in place, leaving the top open.
Your wallet is finished!
Return to Top of Preschool Fathers Day Crafts
Want to Look Around Some More?...
 |
Marcia Reagan is the creator of DaycareAnswers and lives in Central Minnesota with her husband and two children. She's been an in-home daycare provider for over twenty years and loves to share her experience and passion for daycare with other providers. |


![]()
I have affiliate links. If you buy something through a link, I receive a small commission at no additional cost to you. That keeps this site free! To learn more, read my full Disclosure Policy. |